1) Create a MySQL database on the website.
2) Upload several files to your website.
3) Run the PHP file for the first time to set up some important parameters.
4) Configure each copy of Worship LIVE! with the appropriate login information.
5) Upload the master database from whichever computer you designate as the master database.
|
1) Create MySQL Database
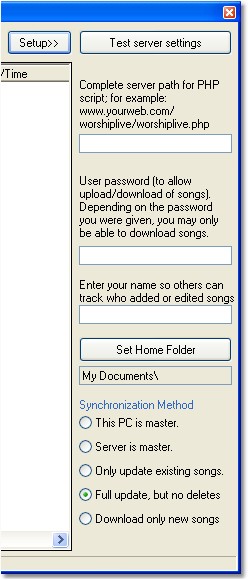
The website system administrator will need to create a MySQL database and provide you with a username and password with full read/write access priviliges to the database. The configuration software will handle creating the proper table structure by itself. 2) Upload the three PHP files and a few images We recommend installing this code in a subfolder on your website, NOT the main root folder. Since the main file is named "index.php", most web servers will send this page to the user when they access that folder. For example, if you upload it to a folder named "worshiplive", if you visited http://www.yourserver.com/worshiplive/ in your browser, the database would be available. However, for the same reason, if you upload these files to your main web folder, it will probably overwrite or replace your main page! 3) Run the configuration file Launch the main synchronization web page (for example http://www.yourserver.com/worshiplive/). If the settings have not been configured properly, the web page itself will directly you to run the configuration routine. When you submit the form with the required security settings, the software will proceed to build the required tables in the database. ONCE THIS FILE HAS COMPLETED SUCCESSFULLY AND YOU HAVE CONFIRMED THAT YOU CAN ACCESS THE DATABASE FROM THE WORSHIP LIVE! DESKTOP SOFTWARE, WE STRONGLY RECOMMEND THAT YOU DELETE OR OTHERWISE DISABLE THIS CONFIGURATION SCRIPT (worshiplive_configure.php). OTHERWISE, ANYONE CAN RUN IT AND CHANGE YOUR SETTINGS, AND LEARN YOUR DATABASE ACCESS PASSWORD. 4) Configure the desktop software Now you need to configure the desktop copy of Worship LIVE! to use the correct information. Select "Synchronize database to server" from the File:Database menu of the library. When the sync database appears, click the "Setup>>" button at top right. The "Complete server path" will include your website address plus the folder and script name. If you placed the script in a folder named "worshiplive" and the name is "index.php", your information may look like "http://www.myserver.com/worshiplive/index.php". The password depends on the role. If the computer you are setting up is the master database, or you want this user to be able to edit songs, enter the master password. Otherwise enter the user password so that this computer will not be able to edit or delete songs. Finally enter a name. This is shown on the web interface, so that you can tell who made the most recent edits. You also need to pick a role for this user. |
|
When you are done with configuring the desktop software, click the "Test server settings" button to make sure that Worship LIVE! can successfully connect to the server.
5) Upload the master database
From whichever computer will be the master database to which the other computers will be matched, upload the entire database, by clicking the "Upload All >>" button. This process may take a while, depending on the speed of your internet connection. On a broadband connection, a 300 song database will probably take 5-10 minutes for the first complete upload. A modem connection may take longer. Subsequent synchronizations will be much faster.